
Frequently Asked Questions
Here are some easy-to-follow tips for troubleshooting your Haag-Streit or Reliance equipment, and keep it functioning properly. But we’re happy to help if you can’t solve the problem yourself.

EyeSuite FAQ
Instruction for devices connected to the internet.
Open EyeSuite. Click the Register button. Fill out the end user information and click continue button. Skip the Distributor page on the next screen. Click on “Register online.” You will receive an email shortly after completing. Click to confirm your email address within the body of the email. A webpage will open with a license code for the registration; you do not have to do anything with this code. Simply click the link and you will have registered EyeSuite.
See link for video instruction for video.
https://www.haag-streit.com/haag-streit-usa/contact/haag-streit-usa/haag-streit-usa/customer-support/ scroll to Online Registration Video for EyeSuite
Choose “Register by Email.” EyeSuite will prompt you to save a document. Open the document and follow instructions on the document to register. Alternately, after you choose “Register by email,” EyeSuite will open and a QR Code will appear on the screen. You can scan this QR code with camera app on an Android or iPhone. This will take you to a website and the confirmation email will be sent to the address you put on the first page of the registration.
Updates are available on an annual basis and are usually introduced to the US in the beginning of each calendar year. Check the website to see what version is current. If you need to be updated go to
https://www.haag-streit.com/haag-streit-usa/contact/haag-streit-usa/haag-streit-usa/customer-support/ scroll to complete an EyeSuite Software Update form, and an agent will contact you.
Open EyeSuite. Go to ?–> About EyeSuite, in this example it is version i9.0.2.
Diagnostics FAQ
- For Tungsten Bulb style lamp. Bulb Style Troubleshooting.
- For LED Bulb style lamp. LED Style Troubleshooting.
- The slit adjustment knob needs tightening. Tighten Slit Adjust.
- See detailed instructions. Slit Lamp Disinfection
- Routine Slit Lamp Cleaning
- See detailed instructions
Imaging FAQ
The Haag-Streit imaging system attaches a HS camera to a 900BQ, 900BI, and 900BP slit lamp to take advantage of Haag-Streit world class optics. The camera is connected to the computer thru the trigger (RM01, RM02). There are 4 main components – camera, trigger, power supply to trigger, computer.
Confirm that the green power indicator light on the RM02 is lit solid green.
The camera has an indicator light located at the bottom of the camera.
Light is green: Camera and computer are connected.
Light is red: The camera and computer are not connected. Unplug the camera from the trigger and plug directly to the computer to see if you get a green light on the camera.
Connect directly to the computer (ensure you are in the correct USB port see “What Camera System Do I Have?”)
Light is green: Indicates camera is connecting and the issue is in the power source to trigger or trigger.
Light is red: Drivers from the camera should install automatically when the camera is plugged into the computer. A red light indicates this did not occur and you will need to manually install drivers. Fill out service form below for further assistance.
Power cycle RM02 by depressing the power switch down until the green light goes off. Then push the switch to reactivate.
Lenstar FAQ
If this is the first time receiving these errors, resetting the system can sometimes resolve the issue.
Power down all devices on the table.
Remove power from the table by unplugging it from the power supply and allow to sit for a minute. This allows all components to power down completely.
Return power to table, and test unit.
If the error reappears on operation or if the failure becomes common please complete the form below to be contacted by an agent.
Does any device on the table power on?
If yes – Try Lenstar in a different outlet in room. If the unit does not come one it may be the power block. Insure that the power cord is secure in the power block. If all is secure then fill out the form below to be contacted by an agent.
If no- Does the table rise?
If no – Ensure power cord is secure at table and wall or battery backup. Unplug from backup into wall. If this does not correct the issue check fuses in table. Replacing fuses in Reliance Table
If table rises and devices are not powered on – Outlets on table may be bad. Try plugging the Lenstar into a wall outlet. If Lenstar powers on lift needs to be replaced. Complete the form below to be contacted by agent.
There is no need to power down the computer for the Lenstar every day. It is important to close EyeSuite every day in order to ensure you are backing up. Let your Lenstar computer go into hibernate state on weekday evenings and power it fully off for weekends.
Once you switch out the Lenstar, place the Lenstar that was on the table using the insert as a guide, and the contracted shipping company will contact you and arrange a pickup.
The serial number of the unit is located on the patient side of the Lenstar. An easier way is to pull out the test eye, usually located in the drawer of the Lenstar table. If the eye has been replaced it may not have the number in a prominent position, use the serial number on the unit.
Octopus FAQ
Yes, you should. By clicking on File and Exit, the 600 will properly shut down and make important backups if something were to go wrong in the future. Once the backup is complete, and the Octopus is powered down, move the rocker switch at the base of the Octopus to the OFF position.
Note: This process is best accomplished by an individual with IT experience. If that is not you complete the form below to contact an agent for assistance.
Create a destination folder on a Windows PC and give it all shared privileges, especially the advanced sharing privileges.
On the Octopus, you will now setup the Windows Shares portion to connect the 600 to the folder that you created.
Go to Tools->Preferences, expand General menu, choose Operating System Settings and select the Windows Shares tab.
Enter the password to gain entry, which is AdvPref. Add a Windows Shares connection by filling out all of the requisite sections. Once the status is OK, your Windows Shares connecting is completed.
Now you can setup the Octopus to export the PDFs. While in the Tools -> Preferences menu, expand the Perimetry menu and select Printout. Here, you can set up print jobs. Since your Windows Shares is already connected, click the browse button next to the output path to connect to your Windows Shares path.
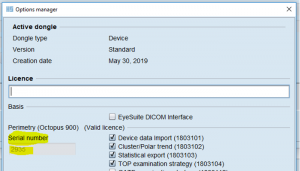
Every unit has a silver label located normally on the side of the unit. Look for SN xxxx. However, you can also Open EyeSuite->Tools->Option Manager to see your serial number.
Octopus Clinical Support FAQ
The Octopus 600 provides pattern testing of the Octopus G, M and 32; the HFA patterns of 10-2, 24-2 and 24-2C, 30-2 for thresholding as well a 45-second screening. Pulsar methods are provided in the G, 32 and GST patterns. Since the 600 is a central 30 degree instrument it does NOT perform Esterman, 60 degree Ptosis testing, Low Vision or Goldmann Kinetic Perimetry. These programs are available on our Octopus 900 Bowl Perimeter.
The Octopus 600 comes standard with the +1 thru +4 and -1 thru -8 lenses. Recently, the -9 and -10 lenses have become available and can be purchased separately.
We recommend properly occluding your patients with the occluders that are provided with the purchase of your instrument. The white occluders allow enough light through to the non-tested eye so that less time is needed for proper accommodation.
To be on the safe side, please ensure that all edits are completed, including the drawing of your isopters, before saving your kinetic field.
If you are using an HFA 700 series and the hard drive is in working order, a one-time transfer of the data is possible. For our Octopus 600, the 10-2, 24-2 and 30-2 patterns are available. For our Octopus 900, these same patterns as well as many of the HFA library are available. In addition, you can view the data in our EyeSuite in the HFA format as well as obtain physical or electronic prints of the HFA style printouts. To see what Octopus provides, please call 888.848.8923 +2 +1 +1 to schedule an on-line demonstration.
To correct a patient’s information once it has been saved is a simple fix – just choose the patient, hit EDIT and update. If the same patient was listed twice with fields run on both, simply select the incorrect patient’s name, select the fields and drag and drop to the correct name. The same is done if you need to move a field from the wrong patient to the correct patient. Call 888.848.8923 +2 +1 +1 if you need additional support for these corrections.
The platform of EyeSuite in moving from i8 to i9 is quite different – not only from the operation but from the viewing of the data. This is why we want all practices to set up a quick overview of the features and increased benefits in moving from one platform to the next. There is no charge for the software in going from i8 to i9 and we even provide a free overview for technicians and physicians to ensure everyone knows the benefits. Call 888-848-8923 +2 +1 +1 for additional information.
NO, you will NOT lose your patient data! Our PeriTrend Software stores all patient .pvd files in a sub-folder called ExDAT. Simply copy this data to a flash drive and upload into the EyeSuite Software. If you need assistance, please contact our Software Support Team at 888-848-8923 +2 +2 +3.
EyeSuite can be purchased for use with either of these perimeters. It is the driving software to both our Octopus 600 and Octopus 900 perimeters. EyeSuite allows for ease of use in viewing today’s visit, comparison of two visits and viewing trends after 3 visits. It enables you to view or print in the HFA mode, if you have an associate or referring doctor who is used to the Humphrey. It allows for the creation of an electronic printout to pull in to your EMR and/or you can set up viewing stations to allow for “real-time interactive access to all your perimetric data!” Please call 888-848-8923 + 2 +1 +1 to set up an on-line demonstration of our EyeSuite Software.
We sell our perimeters through an authorized distributor network. Your sales representative is responsible for the initial installation and overview of your device. Once a new perimeter is installed, we provide complimentary on-line trainings for the first full year of your warranty. Whether you need 3 sessions or 13 – we’re here to help you. Once your warranty is completed, our hourly rates are some of the lowest in the industry. Simply call 888-848-8923 +2 +1 +1 and we will be happy to schedule an on-line training.
Reliance FAQ
- Ensure power cord is secure in the base of the chair and power source.
- Remove power cord from chair and re-attach. If chair does not give an audible beep, fill out the Support Request form for additional assistance.
- Ensure power cord is secure in the base of the chair and power source.
- Units with wells – Ensure that the STBY switch is activated by pushing the switch. If the STBY switch is on it will be backlit. Note: charging lights on occupied wells will be lit, even if STBY is not activated.
- Unit without wells – If the word BASE is not backlit, fill out the Support Request form for assistance.
To learn more download, the Replacing Halogen Bulb PDF.
See serial number guide. Serial number guide.
- Upholstery pieces for chairs built 1994 or later can be ordered for replacement. Fill out a parts request form.
- How do I change out the upholstery on my 980, 7000, and 710? Replacing upholstery on 7000, 980, 710, 7000 Chairs
- 6200 upholstery are the same as the 7000 with the exemption of the back. Removing 6200 upholstered back.
- 520 chairs have various ways of replacing upholstery. Please refer to your manual.
- Assuming that other functions are working, the upper limit switch is either out of adjustment or failed. Please fill out the Support Request form for assistance.
- Hesitation at the beginning of the ascent of the base indicates air in the lines.
In order to purge the air from the lines.
- Lower the base to its lowest position.
- Go to a remote to lower the base.
- While keeping the pressure on the down switch activate the raise base switch.
- The chair base will not raise, but it pushes the oil and air thru the system.
- Hesitation at the end of travel indicates the base I low on oil. Before adding oil one must first find the leak. Fill out the Support Request form for additional assistance.
- While the chair base is elevated, and begins to drift down, remove power from the chair.
- If drifting stops the problem is electrical.
- If drifting does not stop it is hydraulic.
- Complete a service form for additional assistance.
- The one-handed #18 headrest has been the standard since 1990. Squeezing the handle should release the lock. Releasing the lock should allow the headrest to lock in position. If you do not get these results or you feel there is too much side-to-side movement, please fill out the Support Request form for assistance.
Surgical FAQ
Click to view a larger image.
| Microscope | Xenon Lamp | Halogen Lamp |
| FS 5-33 | 196 664 | |
| FS 3-43 | 196 664 | |
| FS 2-23 | 196 664 | |
| FS 2-21 | 64634 | |
| FS 2-11 | 64634 | |
| FS 1-12 | 64634 |

Click for a larger image
| Scopes |
PN: 4840-105GL Size: 42” X 105” |
PN: 4840-120GL Size: 42” X 120” |
4850-120GL Size: 54” X 120” |
| Hi-R 700 / FS 2-23 | X | X | |
| Hi-R 700 / FS 3-43 | X | X | |
| Hi-R 700 / FS 5-33 | X | ||
| Hi-R 1000 / FS 5-33 | X |